Contador nichichanilimonada

viernes, 22 de mayo de 2020

Nmap: Getting Started Guide


Nmap is a free utility tool for network discovery, port scanning and security auditing, even though we can use it for more than that but in this article we will learn how to do these three things with nmap.

The original author of nmap is Gordon Lyon (Fyodor). Nmap is licensed under GPL v2 and has available ports in many different languages. Nmap is available for Linux, Windows, and Mac OS X. You can download your copy of nmap from their website.

Lets get started with nmap.

When performing pentests we always look for networks we are going to attack. We need to identify live hosts on the network so that we can attack them. There are plenty of tools available for finding live hosts on a network but nmap is one of the best tools for doing this job.

Lets start with simple host (target) discovery scans i,e scans that will tell us which ip address is up on our target network. Those ip addresses which are up on our target network are the ones that are assigned to a device connected on our target network. Every device on the network is going to have a unique ip address.
To perform a simple host discovery scan we use the following command

nmap -v -sn 10.10.10.0/24


flags we used in the above command are
-v for verbose output
-sn to disable port scan (we don't want to scan for ports right now)

Following the flags is the ip address of the target network on which we want to look for live hosts. The /24 at the end of the ip address is the CIDR that specifies the subnet of the network on which we are looking for live hosts.

After running the above command you should get a list of live hosts on your target network.
If you just want to know the list of ip addresses your command is going to scan, you can use the -sL flag of the nmap like this.

nmap -sL 10.10.10.0/24

this command will simply output the list of ip addresses to scan.

We sometimes want to do dns resolution (resolving ip addresses to domain names) when performing our network scans and sometimes we don't want dns resolution. While performing a host discovery scan with nmap if we want to perform dns resolution we use -R flag in our command like this:

nmap -v -sn -R 10.10.10.0/24

And if we don't want to perform dns resolution of hosts during our scan we add the -n flag to our command like this:

nmap -v -sn -n 10.10.10.0/24

After we have discovered the hosts that are up on our target network, we usually put the ip addresses of these hosts into a file for further enumeration.

Next step in our enumeration would be to detect which operating system and which ports are running on these live hosts, for that we run this command:

nmap -O -v 10.10.10.119


here we use -O (capital o not zero) for operating system detection and by default nmap performs SYN Scan for port discovery. However nmap scans for 1000 ports only by default of a particular host.

To make nmap go over a list of ip addresses in a file we use -iL flag like this:

nmap -O -v -iL targetlist

where targetlist is the name of the file which contains ip addresses that we want to perform port scan on.

To make nmap scan all the ports of a target we use the -p flag like this:

nmap -p- -v 10.10.10.121

We can also specify a range of ports using the -p flag like this:

nmap -p1-500 -v 10.10.10.121

here 1-500 means scan all the ports from 1 to 500.

We can use a number of scan techniques to discover open ports on our network but I will only discuss some of them for brevity.

We can perform a TCP SYN scan using nmap with -sS flag like this:

nmap -sS -v 10.10.10.150

We have also flags for TCP connect and ACK scans which are -sT -sA

nmap -sT -v 10.10.10.150

nmap -sA -v 10.10.10.150

We can also perform UDP scan as well instead of TCP scan using -sU flag

nmap -sU -v 10.10.10.150

We can perform TCP Null, FIN, and Xmas scans using the flags -sN, -sF, -sX

nmap -sN -v 10.10.10.150

nmap -sF -v 10.10.10.150

nmap -sX -v 10.10.10.150

If you don't know what these scans are then please visit Port Scanning Techniques and Algorithms for explanation.

After discovering the open ports on our target host, we want to enumerate what services are running on those open ports. To enumerate services and versions information on open ports we use the -sV flag like this:

nmap -sV -v 10.10.10.118

This should give us information about what services are running on what ports and what versions of those services are running on the target host.

nmap has an interesting feature called NSE nmap scripting engine. It allows users to write their own scripts, using the Lua programming language, to automate a wide variety of networking tasks. nmap ships with a diverse set of scripts which are very helpful to enumerate a target. To use the nmap default set of scripts while enumerating the target, we use the -sC flag like this:

nmap -sC -sV -v 10.10.10.118

We can also save the results of our nmap scans to a file using the -o flag like this

nmap -sC -sV -v -oA defaultscan 10.10.10.119

here -oA tells the nmap to output results in the three major formats at once and defaultscan is the name of the file that will be prepended to all the three output files.

This is the end of this short tutorial see you next time.

References:
https://nmap.org/book/scan-methods-null-fin-xmas-scan.html

Continue reading


jueves, 21 de mayo de 2020

British Airline EasyJet Suffers Data Breach Exposing 9 Million Customers' Data

British low-cost airline EasyJet today admitted that the company has fallen victim to a cyber-attack, which it labeled "highly sophisticated," exposing email addresses and travel details of around 9 million of its customers. In an official statement released today, EasyJet confirmed that of the 9 million affected users, a small subset of customers, i.e., 2,208 customers, have also had their

via The Hacker News
Related posts

CEH: System Hacking, Cracking A Password, Understanding The LAN Manager Hash, NetBIOS DoS Attacks


Passwords are the key element of information require to access the system. Similarly, the first step is to access the system is that you should know how to crack the password of the target system. There is a fact that users selects passwords that are easy to guess. Once a password is guessed or cracked, it can be the launching point for escalating privileges, executing applications, hiding files, and covering tracks. If guessing a password fails, then passwords may be cracked manually or with automated tools such as a dictionary or brute-force method.

Cracking a Password

Passwords are stored in the Security Accounts Manager (SAM) file on a Windows system and in a password shadow file on a Linux system.

Manual password cracking involves attempting to log on with different passwords. The hacker follows these steps:
  1. Find a valid user account (such as Administrator or Guest).
  2. Create a list of possible passwords.
  3. Rank the passwords from high to low probability.
  4. Key in each password.
  5. Try again until a successful password is found.
A hacker can also create a script file that tries each password in a list. This is still considered manual cracking, but it's time consuming and not usually effective.

A more efficient way of cracking a password is to gain access to the password file on a system. Most systems hash (one-way encrypt) a password for storage on a system. During the logon process, the password entered by the user is hashed using the same algorithm and then compared to the hashed passwords stored in the file. A hacker can attempt to gain access to the hashing algorithm stored on the server instead of trying to guess or otherwise identify the password. If the hacker is successful, they can decrypt the passwords stored on the server.

Understanding the LAN Manager Hash

Windows 2000 uses NT LAN Manager (NTLM) hashing to secure passwords in transit on the network. Depending on the password, NTLM hashing can be weak and easy to break. For example, let's say that the password is 123456abcdef . When this password is encrypted with the NTLM algorithm, it's first converted to all uppercase: 123456ABCDEF . The password is padded with null (blank) characters to make it 14 characters long: 123456ABCDEF__ . Before the password is encrypted, the 14-character string is split in half: 123456A and
BCDEF__ . Each string is individually encrypted, and the results are concatenated:

123456A = 6BF11E04AFAB197F
BCDEF__ = F1E9FFDCC75575B15

The hash is 6BF11E04AFAB197FF1E9FFDCC75575B15 .

Cracking Windows 2000 Passwords

The SAM file in Windows contains the usernames and hashed passwords. It's located in the Windows\system32\config directory. The file is locked when the operating system is running so that a hacker can't attempt to copy the file while the machine is booted to Windows.

One option for copying the SAM file is to boot to an alternate operating system such as DOS or Linux with a boot CD. Alternately, the file can be copied from the repair directory. If a system administrator uses the RDISK feature of Windows to back up the system, then a compressed copy of the SAM file called SAM._ is created in C:\windows\repair . To expand this file, use the following command at the command prompt:

C:\>expand sam._ sam

After the file is uncompressed, a dictionary, hybrid, or brute-force attack can be run against the SAM file using a tool like L0phtCrack. A similar tool to L0phtcrack is Ophcrack.

Download and install ophcrack from http://ophcrack.sourceforge.net/

Redirecting the SMB Logon to the Attacker

Another way to discover passwords on a network is to redirect the Server Message Block (SMB) logon to an attacker's computer so that the passwords are sent to the hacker. In order to do this, the hacker must sniff the NTLM responses from the authentication server and trick the victim into attempting Windows authentication with the attacker's computer.

A common technique is to send the victim an email message with an embedded link to a fraudulent SMB server. When the link is clicked, the user unwittingly sends their credentials over the network.

SMBRelay

An SMB server that captures usernames and password hashes from incoming
SMB traffic. SMBRelay can also perform man-in-the-middle (MITM) attacks.

SMBRelay2

Similar to SMBRelay but uses NetBIOS names instead of IP addresses to capture usernames and passwords.

pwdump2

A program that extracts the password hashes from a SAM file on a Windows system. The extracted password hashes can then be run through L0phtCrack to break the passwords.

Samdump

Another program that extracts NTLM hashed passwords from a SAM file.

C2MYAZZ

A spyware program that makes Windows clients send their passwords as clear text. It displays usernames and their passwords as users attach to server resources.

NetBIOS DoS Attacks

A NetBIOS denial-of-service (DoS) attack sends a NetBIOS Name Release message to the NetBIOS Name Service on a target Windows systems and forces the system to place its name in conflict so that the name can no longer be used. This essentially blocks the client from participating in the NetBIOS network and creates a network DoS for that system.
  1. Start with a memorable phrase, such as "Maryhadalittlelamb"
  2. Change every other character to uppercase, resulting in "MaRyHaDaLiTtLeLaMb"
  3. Change a to @ and i to 1 to yield "M@RyH@D@L1TtLeL@Mb"
  4. Drop every other pair to result in a secure repeatable password or "M@H@L1LeMb"

Now you have a password that meets all the requirements, yet can be "remade" if necessary.

Related word


  1. Hacking In Spanish
  2. Aprender A Ser Hacker
  3. Clases De Hacker
  4. Hacking Tools
  5. Que Es Hacking Etico
  6. Programa De Hacking
  7. Hacking Software
  8. Hacking Articles
  9. Hacking Course

Collection Of Pcap Files From Malware Analysis


Update: Feb 19. 2015

We have been adding pcaps to the collection so remember to check out the folder ( Pcap collection) for the recent pcaps.

I had a project to test some malicious and exploit pcaps and collected a lot of them (almost 1000) from various public sources. You can see them in the PUBLIC folder. The credits go to the authors of the pcaps listed in the name of each file. Please visit their blogs and sites to see more information about the pcaps, see their recent posts, and send them thanks. The public pcaps have no passwords on them.


Update:Dec 13. 2014 


Despite rare updates of this post, we have been adding pcaps to the collection so remember to check out the folder ( Pcap collection (New link)) for the recent pcaps!


Update:Dec 31. 2013 - added new pcaps

I did some spring cleaning yesterday and came up with these malware and exploit pcaps. Such pcaps are very useful for IDS and signature testing and development, general education, and malware identification. While there are some online public sandboxes offering pcaps for download like Cuckoo or Anubis but  looking for them is a tedious task and you cannot be totally sure the pcap is for the malware family supposedly analysed - in other words, if the sandbox says it is Zeus does not necessarily mean that it is.

I found some good pcap repositories here (http://www.netresec.com/?page=PcapFiles) but there are very few pcaps from malware.

These are from identified and verified (to the best of my knowledge and belief - email me if you find errors) malware samples.

All of them show the first stage with the initial callback and most have the DNS requests as well. A few pcaps show extended malware runs (e.g. purplehaze pcap is over 500mb).
Most pcaps are mine, a few are from online sandboxes, and one is borrowed from malware.dontneedcoffee.com. That said, I can probably find the corresponding samples for all that have MD5 listed if you really need them. Search contagio, some are posted with the samples.

Each file has the following naming convention:
BIN [RTF, PDF] - the filetype of the dropper used, malware family name, MD5, and year+month of the malware analysis.

I will be adding more pcaps in the future. Please donate your pcaps from identified samples, I am sure many of you have.

Thank you


Download


Download all together or separately.

All pcaps archives have the same password (same scheme), email me if you need it. I tried posting it without any passwords and pass infected but they get flagged as malware. Modern AV rips though zips and zips with the pass 'infected' with ease.


APT PCAPS


  1. 2012-12-31 BIN_Xinmic_8761F29AF1AE2D6FACD0AE5F487484A5-pcap
  2. 2013-09-08 BIN_TrojanPage_86893886C7CBC7310F7675F4EFDE0A29-pcap
  3. 2013-09-08 BIN_Darkcomet_DC98ABBA995771480AECF4769A88756E-pcap
  4. 2013-09-02 8202_tbd_ 6D2C12085F0018DAEB9C1A53E53FD4D1-pcap
  5. 2013-09-02 BIN_8202_6d2c12085f0018daeb9c1a53e53fd4d1-pcap
  6. 2013-09-02 BIN_Vidgrab_6fd868e68037040c94215566852230ab-pcap
  7. 2013-09-02 BIN_PlugX_2ff2d518313475a612f095dd863c8aea-pcap
  8. 2013-09-02 BIN_Taidoor_46ef9b0f1419e26f2f37d9d3495c499f-pcap
  9. 2013-09-02 BIN_Vidgrab_660709324acb88ef11f71782af28a1f0-pcap
  10. 2013-09-02 BIN_Gh0st-gif_f4d4076dff760eb92e4ae559c2dc4525-pcap.zip
  11. 2013-07-15 BIN_Taleret.E_5328cfcb46ef18ecf7ba0d21a7adc02c.pcap
  12. 2013-05-14 BIN_Mediana_0AE47E3261EA0A2DBCE471B28DFFE007_2012-10.pcap
  13. 2013-05-14 BIN_Hupigon_8F90057AB244BD8B612CD09F566EAC0C
  14. 2013-05-14 BIN_LetsGo_yahoosb_b21ba443726385c11802a8ad731771c0_2011-07-19
  15. 2013-05-13 BIN_IXESHE_0F88D9B0D237B5FCDC0F985A548254F2-2013-05-pcap
  16. 2013-05-06 BIN_DNSWatch_protux_4F8A44EF66384CCFAB737C8D7ADB4BB8_2012-11-pcap
  17. 2013-05-06 BIN_9002_D4ED654BCDA42576FDDFE03361608CAA_2013-01-30-pcap
  18. 2013-05-06 BIN_BIN_RssFeeder_68EE5FDA371E4AC48DAD7FCB2C94BAC7-2012-06-pcap (not a common name, see the traffic ssheet http://bit.ly/maltraffic )
  19. 2013-04-30 BIN_MSWab_Yayih_FD1BE09E499E8E380424B3835FC973A8_us-pcap
  20. 2013-04-29 BIN_LURK_AF4E8D4BE4481D0420CCF1C00792F484_20120-10-pcap
  21. 2013-04-29 BIN_XTremeRAT_DAEBFDED736903D234214ED4821EAF99_2013-04-13-pcap
  22. BIN_Enfal_Lurid_0fb1b0833f723682346041d72ed112f9_2013-01.pcap
  23. BIN_Gh0st_variant-v2010_B1D09374006E20FA795B2E70BF566C6D_2012-08.pcap
  24. BIN_Likseput_E019E37F19040059AB5662563F06B609_2012-10.pcap
  25. BIN_Nettravler_1f26e5f9b44c28b37b6cd13283838366.pcap
  26. BIN_Nettravler_DA5832657877514306EDD211DEF61AFE_2012-10.pcap
  27. BIN_Sanny-Daws_338D0B855421867732E05399A2D56670_2012-10.pcap
  28. BIN_Sofacy_a2a188cbf74c1be52681f998f8e9b6b5_2012-10.pcap
  29. BIN_Taidoor_40D79D1120638688AC7D9497CC819462_2012-10.pcap
  30. BIN_TrojanCookies_840BD11343D140916F45223BA05ABACB_2012_01.pcap
  31. PDF_CVE-2011-2462_Pdf_2011-12.pcap
  32. RTF_Mongall_Dropper_Cve-2012-0158_C6F01A6AD70DA7A554D48BDBF7C7E065_2013-01.pcap
  33. OSX_DocksterTrojan.pcap

CRIMEWARE PCAPS


  1. 2013-11-12_BIN_ChePro_2A5E5D3C536DA346849750A4B8C8613A-1.pcap
  2. 2013-10-15_BIN_cryptolocker_9CBB128E8211A7CD00729C159815CB1C.pcap
  3. 2013-09-20_BIN_Lader-dlGameoverZeus_12cfe1caa12991102d79a366d3aa79e9.pcap
  4. 2013-09-08 BIN_Tijcont_845B0945D5FE0E0AAA16234DC21484E0-pcap
  5. 2013-09-08 BIN_Kelihos_C94DC5C9BB7B99658C275B7337C64B33-pcap.zip
  6. 2013-08-19 BIN_Nitedrem_508af8c499102ad2ebc1a83fdbcefecb-pcap
  7. 2013-08-17 BIN_sality_CEAF4D9E1F408299144E75D7F29C1810-pcap
  8. 2013-08-15 BIN_torpigminiloader-pcap.zip
  9. 2013-13-08 EK_popads_109.236.80.170_2013-08-13.pcap
  10. 2013-11-08 BIN_Alinav5.3_4C754150639AA3A86CA4D6B6342820BE.pcap
  11. 2013-08-08 BIN_BitcoinMiner_F865C199024105A2FFDF5FA98F391D74-pcap
  12. 2013-08-07 BIN_ZeroAccess_Sirefef_C2A9CCC8C6A6DF1CA1725F955F991940_2013-08-pcap
  13. 2013-07-05 BIN_Kuluoz-Asprox_9F842AD20C50AD1AAB41F20B321BF84B
  14. 2013-05-31 Wordpress-Mutopy_Symmi_20A6EBF61243B760DD65F897236B6AD3-2pcap.pcap
  15. 2013-05-15 BIN_Zeus_b1551c676a54e9127cd0e7ea283b92cc-2012-04.pcap
  16. 2013-05-15 BIN_Gypthoy_3EE49121300384FF3C82EB9A1F06F288-2013-05.pcap
  17. 2013-05-12 BIN_PassAlert_B4A1368515C6C39ACEF63A4BC368EDB2-2013-05-13
  18. 2013-05-12 BIN_HorstProxy_EFE5529D697174914938F4ABF115F762-2013-05-13-pcap
  19. 2013-05-12 BIN_Bitcoinminer_12E717293715939C5196E604591A97DF-2013-05-12-pcap
  20. 2013-05-07 BIN_ZeroAccess_Sirefef_29A35124ABEAD63CD8DB2BBB469CBC7A_2013-05-pcapc
  21. 2013-05-05 BIN_PowerLoader_4497A231DA9BD0EEA327DDEC4B31DA12_2013-05-pcap
  22. 2013-05-05 BIN_GameThief_ECBA0FEB36F9EF975EE96D1694C8164C_2013-03-pcap
  23. 2013-05-05 BIN_PowerLoader_4497A231DA9BD0EEA327DDEC4B31DA12_2013-05-pcap
  24. 2013-04-27 EK_BIN_Blackhole_leadingto_Medfos_0512E73000BCCCE5AFD2E9329972208A_2013-04-pcap
  25. 2013-04-26 -- BIN_Citadel_3D6046E1218FB525805E5D8FDC605361-2013-04-samp 
  26. BIN_CitadelPacked_2012-05.pcap
  27. BIN_CitadelUnpacked_2012-05.pcap
  28. BIN_Cutwail_284Fb18Fab33C93Bc69Ce392D08Fd250_2012-10.pcap
  29. BIN_Darkmegi_2012-04.pcap
  30. BIN_DarknessDDoS_v8g_F03Bc8Dcc090607F38Ffb3A36Ccacf48_2011-01.pcap-
  31. BIN_dirtjumper_2011-10.pcap
  32. BIN_DNSChanger_2011-12.pcap
  33. BIN_Drowor_worm_0f015bb8e2f93fd7076f8d178df2450d_2013-04.pcap
  34. BIN_Googledocs_macadocs_2012-12.pcap
  35. BIN_Imaut_823e9bab188ad8cb30c14adc7e67066d.pcap
  36. BIN_IRCbot_c6716a417f82ccedf0f860b735ac0187_2013-04.pcap
  37. BIN_Kelihos_aka_Nap_0feaaa4adc31728e54b006ab9a7e6afa.pcap
  38. BIN_LoadMoney_MailRu_dl_4e801b46068b31b82dac65885a58ed9e_2013-04 .pcap
  39. BIN_purplehaze-2012-01.pcap
  40. BIN_ponyloader_470a6f47de43eff307a02f53db134289.pcap
  41. BIN_Ramnitpcap_2012-01.pcap
  42. BIN_Reedum_0ca4f93a848cf01348336a8c6ff22daf_2013-03.pcap
  43. BIN_SpyEye_2010-02.pcap
  44. BIN_Stabuniq_F31B797831B36A4877AA0FD173A7A4A2_2012-12.pcap
  45. BIN_Tbot_23AAB9C1C462F3FDFDDD98181E963230_2012-12.pcap
  46. BIN_Tbot_2E1814CCCF0C3BB2CC32E0A0671C0891_2012-12.pcap
  47. BIN_Tbot_5375FB5E867680FFB8E72D29DB9ABBD5_2012-12.pcap
  48. BIN_Tbot_A0552D1BC1A4897141CFA56F75C04857_2012-12.pcap
  49. BIN_Tbot_FC7C3E087789824F34A9309DA2388CE5_2012-12.pcap
  50. BIN_Tinba_2012-06.pcap
  51. BIN_Vobfus_634AA845F5B0B519B6D8A8670B994906_2012-12.pcap
  52. BIN_Xpaj_2012-05.pcap
  53. BIN_ZeroAccess_3169969E91F5FE5446909BBAB6E14D5D_2012-10.pcap
  54. BIN_ZeusGameover_2012-02.pcap
  55. BIN_Zeus_2010-12.pcap
  56. EK_Blackholev1_2012-03.pcap
  57. EK_Blackholev1_2012-08.pcap
  58. EK_Blackholev2_2012-09.pcap
  59. EK_Blackhole_Java_CVE-2012-4681_2012-08.pcap
  60. EK_Phoenix_2012-04.pcap
  61. EK_Smokekt150(Malwaredontneedcoffee)_2012-09.pcap -  credit malware.dontneedcoffee.com


Related links


  1. Growth Hacking
  2. Etica Hacker
  3. Hacker Etico
  4. Brain Hacking
  5. Hacking Wikipedia

Hacktivity 2018 Badge - Quick Start Guide For Beginners

You either landed on this blog post because 
  • you are a huge fan of Hacktivity
  • you bought this badge around a year ago
  • you are just interested in hacker conference badge hacking. 
or maybe all of the above. Whatever the reasons, this guide should be helpful for those who never had any real-life experience with these little gadgets. 
But first things first, here is a list what you need for hacking the badge:
  • a computer with USB port and macOS, Linux or Windows. You can use other OS as well, but this guide covers these
  • USB mini cable to connect the badge to the computer
  • the Hacktivity badge from 2018
By default, this is how your badge looks like.


Let's get started

Luckily, you don't need any soldering skills for the first steps. Just connect the USB mini port to the bottom left connector on the badge, connect the other part of the USB cable to your computer, and within some seconds you will be able to see that the lights on your badge are blinking. So far so good. 

Now, depending on which OS you use, you should choose your destiny here.

Linux

The best source of information about a new device being connected is
# dmesg

The tail of the output should look like
[267300.206966] usb 2-2.2: new full-speed USB device number 14 using uhci_hcd
[267300.326484] usb 2-2.2: New USB device found, idVendor=0403, idProduct=6001
[267300.326486] usb 2-2.2: New USB device strings: Mfr=1, Product=2, SerialNumber=3
[267300.326487] usb 2-2.2: Product: FT232R USB UART
[267300.326488] usb 2-2.2: Manufacturer: FTDI
[267300.326489] usb 2-2.2: SerialNumber: AC01U4XN
[267300.558684] usbcore: registered new interface driver usbserial_generic
[267300.558692] usbserial: USB Serial support registered for generic
[267300.639673] usbcore: registered new interface driver ftdi_sio
[267300.639684] usbserial: USB Serial support registered for FTDI USB Serial Device
[267300.639713] ftdi_sio 2-2.2:1.0: FTDI USB Serial Device converter detected
[267300.639741] usb 2-2.2: Detected FT232RL
[267300.643235] usb 2-2.2: FTDI USB Serial Device converter now attached to ttyUSB0

Dmesg is pretty kind to us, as it even notifies us that the device is now attached to ttyUSB0. 

From now on, connecting to the device is exactly the same as it is in the macOS section, so please find the "Linux users, read it from here" section below. 

macOS

There are multiple commands you can type into Terminal to get an idea about what you are looking at. One command is:
# ioreg -p IOUSB -w0 -l

With this command, you should get output similar to this:

+-o FT232R USB UART@14100000  <class AppleUSBDevice, id 0x100005465, registered, matched, active, busy 0 (712 ms), retain 20>
    |   {
    |     "sessionID" = 71217335583342
    |     "iManufacturer" = 1
    |     "bNumConfigurations" = 1
    |     "idProduct" = 24577
    |     "bcdDevice" = 1536
    |     "Bus Power Available" = 250
    |     "USB Address" = 2
    |     "bMaxPacketSize0" = 8
    |     "iProduct" = 2
    |     "iSerialNumber" = 3
    |     "bDeviceClass" = 0
    |     "Built-In" = No
    |     "locationID" = 336592896
    |     "bDeviceSubClass" = 0
    |     "bcdUSB" = 512
    |     "USB Product Name" = "FT232R USB UART"
    |     "PortNum" = 1
    |     "non-removable" = "no"
    |     "IOCFPlugInTypes" = {"9dc7b780-9ec0-11d4-a54f-000a27052861"="IOUSBFamily.kext/Contents/PlugIns/IOUSBLib.bundle"}
    |     "bDeviceProtocol" = 0
    |     "IOUserClientClass" = "IOUSBDeviceUserClientV2"
    |     "IOPowerManagement" = {"DevicePowerState"=0,"CurrentPowerState"=3,"CapabilityFlags"=65536,"MaxPowerState"=4,"DriverPowerState"=3}
    |     "kUSBCurrentConfiguration" = 1
    |     "Device Speed" = 1
    |     "USB Vendor Name" = "FTDI"
    |     "idVendor" = 1027
    |     "IOGeneralInterest" = "IOCommand is not serializable"
    |     "USB Serial Number" = "AC01U4XN"
    |     "IOClassNameOverride" = "IOUSBDevice"
    |   } 
The most important information you get is the USB serial number - AC01U4XN in my case.
Another way to get this information is
# system_profiler SPUSBDataType

which will give back something similar to:
FT232R USB UART:

          Product ID: 0x6001
          Vendor ID: 0x0403  (Future Technology Devices International Limited)
          Version: 6.00
          Serial Number: AC01U4XN
          Speed: Up to 12 Mb/sec
          Manufacturer: FTDI
          Location ID: 0x14100000 / 2
          Current Available (mA): 500
          Current Required (mA): 90
          Extra Operating Current (mA): 0

The serial number you got is the same.

What you are trying to achieve here is to connect to the device, but in order to connect to it, you have to know where the device in the /dev folder is mapped to. A quick and dirty solution is to list all devices under /dev when the device is disconnected, once when it is connected, and diff the outputs. For example, the following should do the job:

ls -lha /dev/tty* > plugged.txt
ls -lha /dev/tty* > np.txt
vimdiff plugged.txt np.txt

The result should be obvious, /dev/tty.usbserial-AC01U4XN is the new device in case macOS. In the case of Linux, it was /dev/ttyUSB0.

Linux users, read it from here. macOS users, please continue reading

Now you can use either the built-in screen command or minicom to get data out from the badge. Usually, you need three information in order to communicate with a badge. Path on /dev (you already got that), speed in baud, and the async config parameters. Either you can guess the speed or you can Google that for the specific device. Standard baud rates include 110, 300, 600, 1200, 2400, 4800, 9600, 14400, 19200, 38400, 57600, 115200, 128000 and 256000 bits per second. I usually found 1200, 9600 and 115200 a common choice, but that is just me.
Regarding the async config parameters, the default is that 8 bits are used, there is no parity bit, and 1 stop bit is used. The short abbreviation for this is 8n1. In the next example, you will use the screen command. By default, it uses 8n1, but it is called cs8 to confuse the beginners.

If you type:
# screen /dev/tty.usbserial-AC01U4XN 9600
or
# screen /dev/ttyUSB0 9600
and wait for minutes and nothing happens, it is because the badge already tried to communicate via the USB port, but no-one was listening there. Disconnect the badge from the computer, connect again, and type the screen command above to connect. If you are quick enough you can see that the amber LED will stop blinking and your screen command is greeted with some interesting information. By quick enough I mean ˜90 seconds, as it takes the device 1.5 minutes to boot the OS and the CTF app.

Windows

When you connect the device to Windows, you will be greeted with a pop-up.

Just click on the popup and you will see the COM port number the device is connected to:


In this case, it is connected to COM3. So let's fire up our favorite putty.exe, select Serial, choose COM3, add speed 9600, and you are ready to go!


You might check the end of the macOS section in case you can't see anything. Timing is everything.

The CTF

Welcome to the Hacktivity 2018 badge challenge!

This challenge consists of several tasks with one or more levels of
difficulty. They are all connected in some way or another to HW RE
and there's no competition, the whole purpose is to learn things.

Note: we recommend turning on local echo in your terminal!
Also, feel free to ask for hints at the Hackcenter!

Choose your destiny below:

1. Visual HW debugging
2. Reverse engineering
3. RF hacking
4. Crypto protection

Enter the number of the challenge you're interested in and press [
Excellent, now you are ready to hack this! In case you are lost in controlling the screen command, go to https://linuxize.com/post/how-to-use-linux-screen/.

I will not spoil any fun in giving out the challenge solutions here. It is still your task to find solutions for these.

But here is a catch. You can get a root shell on the device. And it is pretty straightforward. Just carefully remove the Omega shield from the badge. Now you see two jumpers; by default, these are connected together as UART1. As seen below.


But what happens if you move these jumpers to UART0? Guess what, you can get a root shell! This is what I call privilege escalation on the HW level :) But first, let's connect the Omega shield back. Also, for added fun, this new interface speaks on 115200 baud, so you should change your screen parameters to 115200. Also, the new interface has a different ID under /dev, but I am sure you can figure this out from now on.


If you connect to the device during boot time, you can see a lot of exciting debug information about the device. And after it boots, you just get a root prompt. Woohoo! 
But what can you do with this root access? Well, for starters, how about running 
# strings hello | less

From now on, you are on your own to hack this badge. Happy hacking.
Big thanks to Attila Marosi-Bauer and Hackerspace Budapest for developing this badge and the contests.

PS: In case you want to use the radio functionality of the badge, see below how you should solder the parts to it. By default, you can process slow speed radio frequency signals on GPIO19. But for higher transfer speeds, you should wire the RF module DATA OUT pin with the RX1 free together.


More articles


miércoles, 20 de mayo de 2020

Sharingan - Offensive Security Recon Tool


Sharingan is a recon multitool for offensive security / bug bounty
This is very much a work in progress and I'm relatively new to offensive security in general so if you see something that can be improved please open an issue or PR with suggested changes.

Cloning for development
Outside of your gopath git clone https://github.com/leobeosab/sharingan

Installing
go get github.com/leobeosab/sharingan/cmd/sharingancli

Dependencies
  • NMap
  • Go

Usage

Note
Order matters when it comes to flags it must be sharingancli [globalflags] command [commandflags] if this isn't a wanted feature I can change it but I like how clean it is

DNS

bruteforce
DNS busts the target with a wordlist you provide
sharingancli --target targetname dns --dns-wordlist ~/path/to/wordlist --root-domain target.com


addsubs
Adds subdomains to the program's storage from stdin using pipes
cat subs | sharingancli --target targetname dns addsubs

Scan
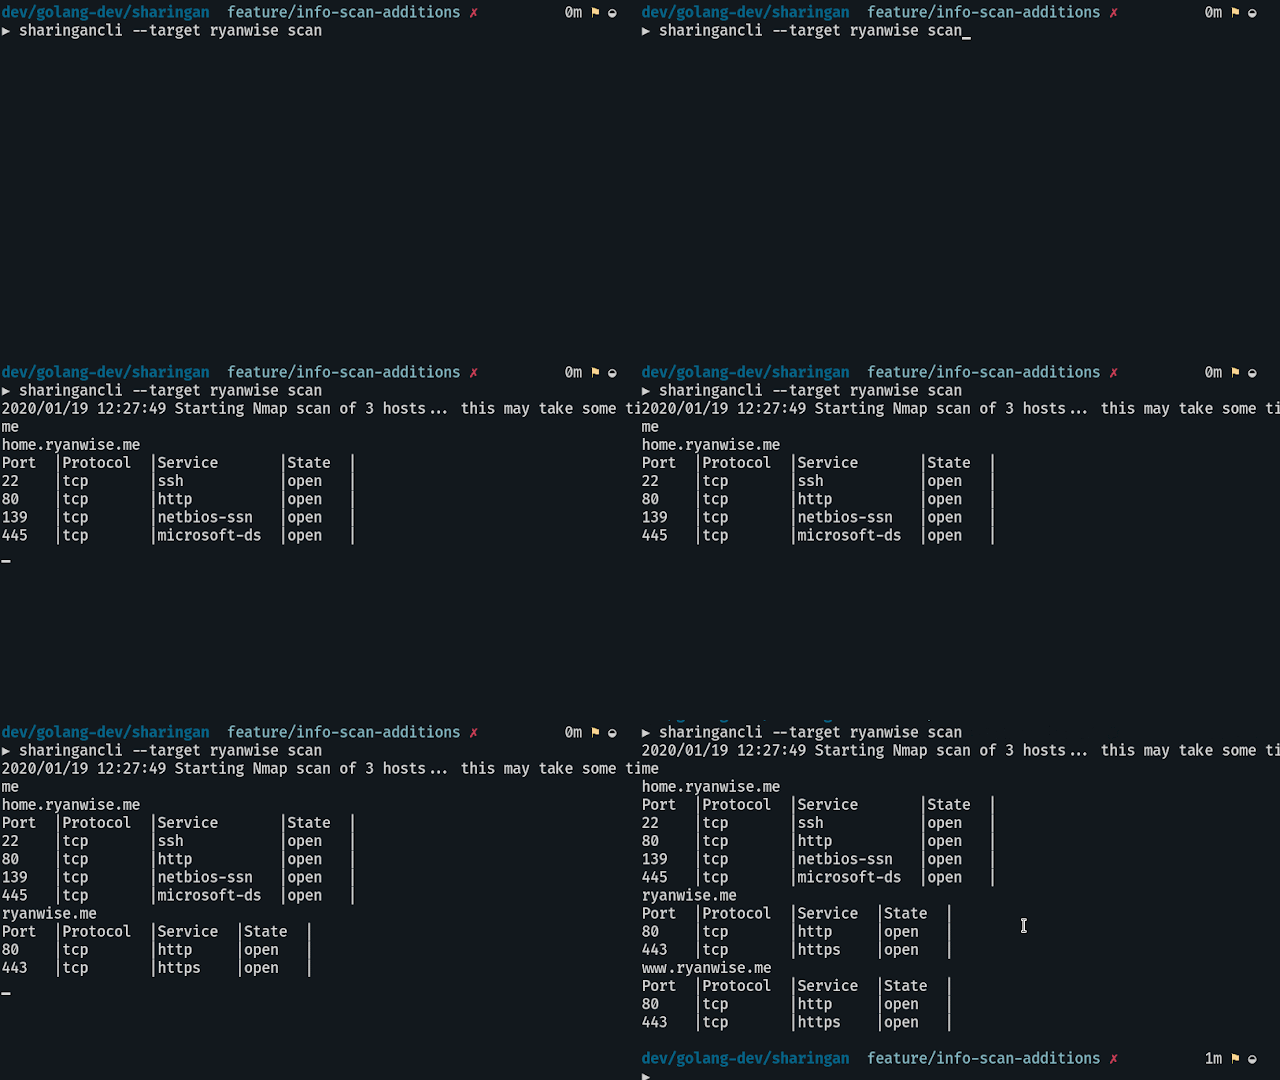
Scans all hosts available that were stored in target using nmap
sharingancli --target target scan


interactive
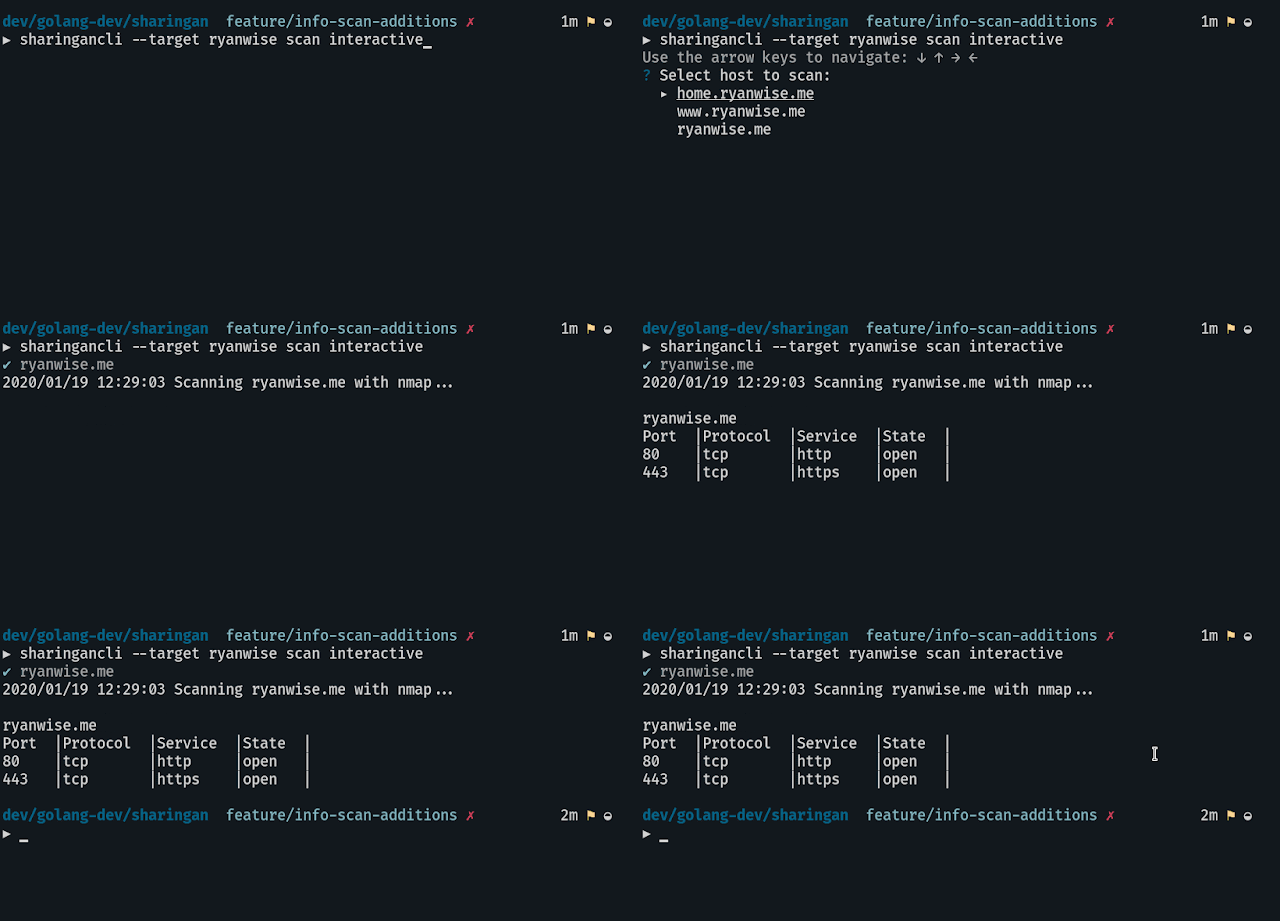
Scan a single host from list of subdomains stored in target
sharingancli --target target scan interactive


info

domains
Outputs all domains as a list in stdout
sharingancli --target target info domains


Features to come
  • Dir brute forcing -- Currently being worked on
  • JSON and regular file exports
  • Automated scans through a daemon?
  • add a way to do SYN / -sS scanning [ must be root so it presents a challenge ]
  • Possible Web ui / html export


via KitPloit

More articles


New DNS Vulnerability Lets Attackers Launch Large-Scale DDoS Attacks

Israeli cybersecurity researchers have disclosed details about a new flaw impacting DNS protocol that can be exploited to launch amplified, large-scale distributed denial-of-service (DDoS) attacks to takedown targeted websites. Called NXNSAttack, the flaw hinges on the DNS delegation mechanism to force DNS resolvers to generate more DNS queries to authoritative servers of attacker's choice,

via The Hacker News

More information


BurpSuite Introduction & Installation


What is BurpSuite?
Burp Suite is a Java based Web Penetration Testing framework. It has become an industry standard suite of tools used by information security professionals. Burp Suite helps you identify vulnerabilities and verify attack vectors that are affecting web applications. Because of its popularity and breadth as well as depth of features, we have created this useful page as a collection of Burp Suite knowledge and information.

In its simplest form, Burp Suite can be classified as an Interception Proxy. While browsing their target application, a penetration tester can configure their internet browser to route traffic through the Burp Suite proxy server. Burp Suite then acts as a (sort of) Man In The Middle by capturing and analyzing each request to and from the target web application so that they can be analyzed.


Everyone has their favorite security tools, but when it comes to mobile and web applications I've always found myself looking BurpSuite . It always seems to have everything I need and for folks just getting started with web application testing it can be a challenge putting all of the pieces together. I'm just going to go through the installation to paint a good picture of how to get it up quickly.

BurpSuite is freely available with everything you need to get started and when you're ready to cut the leash, the professional version has some handy tools that can make the whole process a little bit easier. I'll also go through how to install FoxyProxy which makes it much easier to change your proxy setup, but we'll get into that a little later.

Requirements and assumptions:

Mozilla Firefox 3.1 or Later Knowledge of Firefox Add-ons and installation The Java Runtime Environment installed

Download BurpSuite from http://portswigger.net/burp/download.htmland make a note of where you save it.

on for Firefox from   https://addons.mozilla.org/en-US/firefox/addon/foxyproxy-standard/


If this is your first time running the JAR file, it may take a minute or two to load, so be patient and wait.


Video for setup and installation.


You need to install compatible version of java , So that you can run BurpSuite.

Related news


  1. Hacking Growth Pdf
  2. Chema Alonso Wikipedia
  3. Python Hacking
  4. Mindset Hacking Nacho
  5. Hacking Etico
  6. Rfid Hacking
  7. Hacking Informatico
  8. Cómo Se Escribe Hacker
  9. Que Estudia Un Hacker
  10. Life Hacking
  11. Growth Hacking Barcelona
  12. Grey Hat Hacking
  13. Wordpress Hacking
  14. Hacking Definicion
  15. Curso Growth Hacking
  16. Hacking Food

British Airline EasyJet Suffers Data Breach Exposing 9 Million Customers' Data

British low-cost airline EasyJet today admitted that the company has fallen victim to a cyber-attack, which it labeled "highly sophisticated," exposing email addresses and travel details of around 9 million of its customers. In an official statement released today, EasyJet confirmed that of the 9 million affected users, a small subset of customers, i.e., 2,208 customers, have also had their

via The Hacker News
Related links

British Airline EasyJet Suffers Data Breach Exposing 9 Million Customers' Data

British low-cost airline EasyJet today admitted that the company has fallen victim to a cyber-attack, which it labeled "highly sophisticated," exposing email addresses and travel details of around 9 million of its customers. In an official statement released today, EasyJet confirmed that of the 9 million affected users, a small subset of customers, i.e., 2,208 customers, have also had their

via The Hacker News
More articles

  1. Google Hacking Search
  2. Hacking Quotes
  3. Codigo Hacker
  4. Libros De Hacking Pdf
  5. Hacking Movies
  6. Growth Hacking Examples
  7. Hacking Web Sql Injection
  8. Hacking Tor Whatsapp
  9. Servicio Hacker
  10. Hacking With Arduino
  11. Growth Hacking Definicion

Networking | Routing And Switching | Tutorial 4 | 2018


Welcome to my 4th new tutorial of the series of networking. In this blog you'll the content about network switches. You'll learn about how to make a communication successful and secure in the same network (LAN) by using STP. As Spanning tree protocol (STP) we used in multi-switched networks. Why we use this protocol in multi-switched network etc.

What is Switch? 

A switch is an intelligent device used to connect multiple devices within the same network. The intelligence of is that it requires Media Access Control (MAC) address for communication and doesn't allow broadcast.  Let's understand the whole thing by a little example, consider there is a network having 3 end devices name Device-A, Device-B,Device-C connected with each other respectively with the help of switch. When a Device-A sends data to Device-C so that data will only forwarded by switch to Device-C not to Device-B.

What is Media Access Control (MAC) address?

A Media Access Control (MAC) address is 48-bit unique physical address given to network interface controller (NIC) or network adapter, for communication within the same network which is given by its manufacturer. It is made up of hexadecimal numbers like a1:b1:cc:ac:2e:f1.

What is STP?


STP stands for Spanning tree protocol which is basically used in bridge and switches to prevent loops when you have a redundant links in the Ethernet networks. If the loop is present in the Ethernet network so the whole network will suffer because there will MAC instability in the MAC table,  duplicate frames generation and so on. Let's move to the video for further detail.